STEP ONE: MAKE ELECTRONIC COPIES OF YOUR DOCUMENTS
Gather all of the civil and financial documents that are required. You can either scan or take a photo of your documents. Save those files on your computer so you can upload them. CEAC will only accept files that are in a JPG, JPEG, or PDF format. Each document must be its own file that is no larger than 2 MB. If the original document is in color, please save your scan or photo in color. Name your saved documents something obvious, such as your last name or case number plus the document type. For example “Smith_John_birthcertificate.jpg.”
STEP TWO: LOG ONTO CEAC
Use your NVC case number and invoice ID number to log into CEAC. Both numbers are on the letter you received from NVC. After logging in, look at the chart at the bottom of the Summary Information page. If you haven’t uploaded any documents yet, it will say Start Now for each person on the far-right columns: Affidavit of Support Documents & Financial Evidence (1) and Civil Documents (2). See the picture below:

NOTE: You will not be able to upload any civil documents for a visa applicant until he/she has submitted the immigrant visa application. It will say N/A (not applicable) in the Civil Documents column until the Form DS-260 immigrant visa application is completed on CEAC. If you started uploading documents but did not finish, it will say Incomplete.
STEP THREE: UPLOADING CIVIL DOCUMENTS FOR VISA APPLICANTS
To begin uploading the required civil documents for each person who is applying for an immigrant visa, click on Start Now for the person whose documents you want to upload. You will be taken to a screen with a list of required documents (3). CEAC creates this list for each person based on the information submitted on his or her Form DS-260 visa application. If the status of a document says Missing (4), you need to upload it. To begin, click on the name of the document you want to upload — for example, Birth Certificate (5).

After you select the document name, you will see a list of actions you can take. Click on Attach Document (6).

You’ll be taken to an upload screen (see image at right). Click on Browse (7). This will open up the search screen for your computer. Navigate to
the PDF, JPG, or JPEG file that you saved to your computer earlier (the scan or photo of your original document). Click on the file name of the document you are uploading. The name will appear in the Select a File box (8). Click on the Upload button at the bottom of the page (9) to upload this file. Remember, if the file is larger than 2 MB, you will receive an error message. Follow the same procedure for all of the documents that are required. You must do this for every person who is immigrating.

You can choose a different person from the drop-down box on this page (10). You can also go back to your case’s summary page to choose a different person and begin uploading his or her documents. You do not need to upload everything at once. You can come back another day to finish.

You will know that the documents uploaded successfully if the Status column changes from Missing to Uploaded (11).

However, NVC will not be able to read your documents until you press the Submit Documents button. This button will not be available until you have uploaded all of the required civil documents for every person on your case. Once you do that, the Submit Documents button will turn red. Press that button (12). The status on all of your civil documents will change from Uploaded to Submitted (13). Now NVC will be able to read your documents.

NOTE: Another way to tell that you have submitted everything that is required is to look on the case summary page. The Civil Documents column for each visa applicant should read Submitted.
STEP FOUR: OPTIONAL CIVIL DOCUMENTS
Below the section where you upload the required civil documents, there is a section called Optional Documents. If there is anything else you would like to submit, feel free to follow the same process to upload those documents. If there are no other documents you would like the consular officer to consider, you may leave this section blank. You can always bring additional documents or information to your visa interview at the U.S. Embassy or Consulate.
STEP FIVE: UPLOADING AFFIDAVIT OF SUPPORT DOCUMENTS FOR THE PETITIONER
In family-based immigration, the petitioner must prove that he/she is able to financially support the family members who are applying to immigrate to the United States. This is called being a “financial sponsor.” The petitioner must complete and upload to CEAC an Affidavit of Support Form along with evidence of his/her income. If the petitioner doesn’t have enough income, he or she can ask other family members in the United States to also act as financial sponsors. You can read more about this on our website at nvc.state.gov/aos (English) or nvc.state.gov/aos/espanol (Spanish). Any additional financial sponsors must upload an Affidavit of Support Form and proof of income. There are several types of Affidavit of Support Forms, which is also called the Form I-864. You can learn about these forms and the required evidence of income on our website. After you gather the documents that are required and save them to your computer as PDF, JPG, or JPEG files, go to the case summary chart that appears when you log into CEAC. Click on Start Now for the financial sponsor whose documents you want to upload (14).

You will be taken to a screen with a list of required documents for the petitioner and any other financial sponsors you have listed (15).

STEP SIX: ADDITIONAL FINANCIAL DOCUMENTS
Financial sponsors should upload the Affidavit of Support form (from the Form I-864 series) under Required AOS Documents. But they should upload documents that show their income under Additional AOS Supporting Documentation (16). This section is beneath the list of required documents.

Click on Add a Document (17).
You will then be taken to an upload screen similar to the one you saw in the steps above (see picture at right). The only difference is that you need to choose the type of proof you are uploading – such as federal tax returns or proof of assets – from the drop-down box that appears (18).
You still need to find the document that you saved and press the Upload button. Do this for each financial document that you are submitting. Don’t forget to press the red Submit Documents button when you are done uploading everything that is required to prove your petitioner’s income. Just like with your civil documents, the status on all of your financial sponsors’ documents will change from Uploaded to Submitted. Now NVC will be able to read these documents.

STEP SEVEN: WAIT FOR FEEDBACK FROM NVC
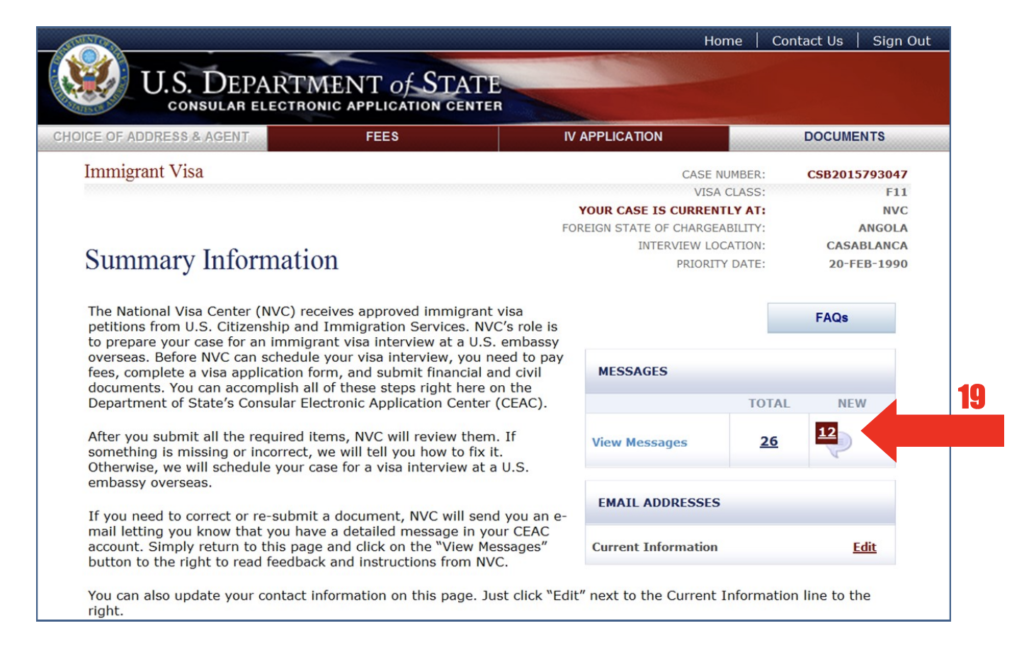
After you have uploaded all of the required civil documents for each visa applicant, and all of the required financial documents for your petitioner and other financial sponsors you have, NVC will review all of these documents. They will let you know if anything is incorrect or missing. If everything that is needed to support your immigrant visa application is there, the next step is for NVC to schedule your visa interview appointment. NVC will provide you with feedback and instructions in the Messages section of your CEAC account (19). Whenever NVC updates your case’s status, they will post a message in CEAC and send an email alert to every email address listed on your case


 The most frequently asked questions about the E-2 investor visa
Leave a Reply